Are you considering Launch Cart as the ecommerce platform to start selling your products?
Want to know if it has all you want in an ecommerce platform?
Keep reading this Launch Cart review because I have explored it myself, used it to create a demo store, and will share my experience with you. You will learn about its features, pros & cons, pricing plans, plus how to create, design, and start selling your products.
Top Pick

Launch Cart
Most affordable and cost-effective e-commerce platform to launch your store and run your Print-on-Demand shop
You don’t need many third-party tools that add to your cost, enjoy lower transaction fees, and a beginner-friendly interface that allows you to launch your e-commerce store in minutes.
Launch Cart Features
Launch Cart features are divided into 7 and we explore them one after another.
1. All-in-one Solution
This compromise all features you need to build your store. Under it, you have:
Cloud-based software
Your store is built in a cloud-based which makes it easy for you to manage from anywhere around the world.
Build Your Brand
Branding creates more awareness and boosts the sales you make in your store. Launch Cart offers you all the tools you need to build a brand as a store owner. There are different free themes and advanced customization options. You can also own and connect a custom domain with just a click.
Tutorial Videos
You can’t get lost while designing your store on Launch Cart. There are free tutorial videos you can watch and learn how to design and grow your online store like a pro.
Monthly New Features
Launch Cart pushes out new features monthly aimed at ensuring that you manage your store and make more sales with ease.
Sell Anything
Whether you want to sell physical or digital products, you have no worries. Launch Cart supports you with cool features. Even if you want to drop ship, you can do that perfectly.
2. Management Of Your Ecommerce Store
Here you see all features you need to manage your ecommerce store like:
Product management: Uploading a product and providing all the information a potential customer needs to know about it.
Order Management: Features that help you process and fulfill orders customers place in your store.
Sales & Coupons: Get the tools you need to create discounts and coupon codes that encourage customers to make purchases
Inventory Tracking: Manage products in your store and notify customers of new arrivals.
Customer Management: Learn how customers make purchases in your store and manage them to keep the sales rolling in.
Data Export Wizard: Use the proprietary tool to download and export your store data to spreadsheets like Excel for analysis.
Global Currencies: Sell your product in 30+ currencies to customers around the world. With Launch Cart, you can set your store’s default currency and configure auto-select IP-based currency selection for buyers who visit from different countries.
Tax & Vat Rules: Since paying tax is compulsory for ecommerce merchants, you can set your tax rules and collect tax based on what’s necessary for you to be compliant.
Shipping Rules: Create shipping rules that state the countries you ship to, at what cost, and the expected time of arrival.
Payment Provider: Use PayPal or Stripe to receive payment anytime you make a sale in your store.
Manage Unlimited Store: Create multiple stores, toggle between them and manage from a single master login.
3. Customize Your Brand
- Choose a theme from the library
- Enable and disable the homepage
- Use the drag-and-drop page builder
- Manage categories
- Set Menus
- Custom Domain ( SSL certified)
4. Technology Tools To Boost Conversion
- 1- Click post checkout upsell and down sell
- Detailed Statistics
- Natively Built-in
- Triggers & Automation
- Abandoned Cart Emails
5. Native Ecom App Built-in
- Review App: Collect reviews and use them to convince potential customers to purchase
- Promotional Bar Pro
- List Builder Pro
- Live Selling
- Automatic Upsell Flows
- Social Bio Link Tool
6. Create Print-On-Demand Products Within Launch Cart
If you want to start a Print on Demand store, Launch Cart has features that support you to create your own products and sell them in your store.
7. Link In Bio Tool
You don’t have to invest in a Link-in-Bio tool to promote your store on social media platforms like Instagram, TikTok, Facebook, LinkedIn, Pinterest, etc. Launch Cart provides you with one and it’s free.
Note: All aforementioned features can be seen on your dashboard. And I will show you how to use them when we explore the Launch Cart dashboard in detail below.
Pros Of Launch Cart
- New features are added monthly
- Has a forever free plan ( no credit card is required)
- Access to free training videos that shows you how to build a profitable online store
- You can sell physical & digital products and also drop ship
- Offers live chat support
- Friendly user-face that supports you to design your store and start selling immediately
- Lower transaction fees when compared to Shopify
Cons Of Launch Cart
- Offers a few advanced marketing apps
Pricing Plans
Launch Cart has 4 different plans:
Free Plan – $0/month ( Limited features, for beginners)
Lift Off Plan – $27/month ( For custom brand stores, best for small businesses)
Growth Plan – $97/month ( To convert more visitors to sales, best for medium size ecommerce merchants)
Scale Plan – $297/month ( To scale your store with customized features, best for large ecommerce merchants)
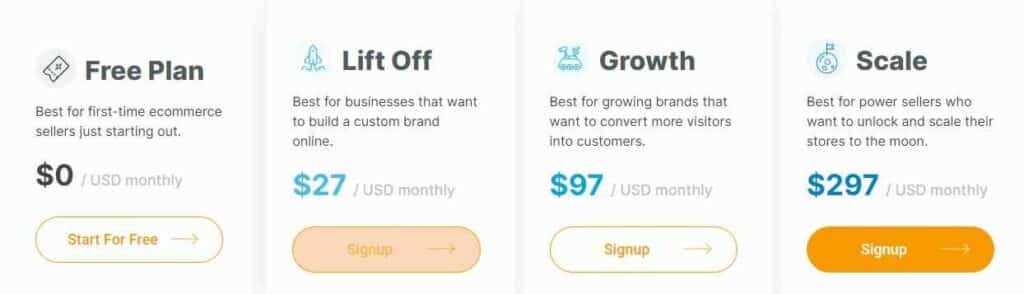
You get a 16% discount for an annual subscription to any of the paid plans.
How To Create Your Store On Launch Cart
Here I work you through how to create and design your store on Launch Cart.
Go to the homepage of Launch Cart, enter your email address and click “Create My Store Now“

You will be taken to a new page where you enter your first and last name. Your email address automatically pops up, so you enter a password and your store name and click ” Get Started Today”

Launch asks you on the next page if you want to hire a specialist from their team to build your ecommerce store.

You wouldn’t need that because the process is simple if you follow what I teach you here.
Click on Continue
Next is to enter your Street, Apartment, City, Post Code, Country, State/Province. This is for verification purposes and for Launch Cart to know where you operate from.
Click ” Finish” after entering all these details.
A prompt appears on your screen telling you that your ecommerce store ( name of the store
included) is ready.
Click on the arrow beside to navigate to your dashboard where you familiarize yourself with the Launch Cart interface and begin to design your store.
You can check your email to see your login details which Launch Cart sent to you.
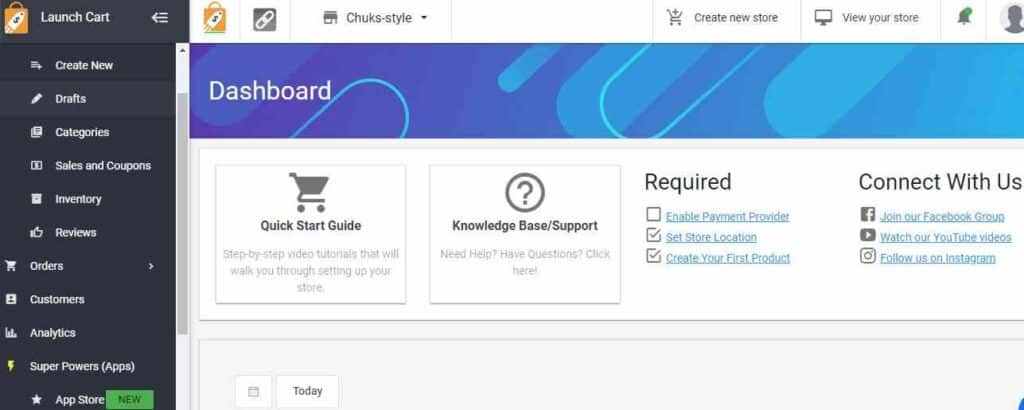
Below is my dashboard as a new store owner:
This is exactly what yours will look like when you create one.
Let’s Explore The Dashboard In Details
Product tab
Here you add products to your store.
Launch Cart makes product upload easy. When you click on Add a product, it gives you 3 options:
Create new: This is for physical or downloadable products. You are required to fill in your product details.
Print On Demand Products: This is suitable if you have customized graphics like artwork you want customers to print on their shirts, mugs, caps, etc. Use Print On Demand platforms like Printful and Printify to fulfill this.
Design Marketplace: If you don’t have designs for your product, go to Launch Cart marketplace to get images to place on your products.

Since I want to sell digital products in my store. So I clicked on Add a product and select Create new, so I can upload an e-valentine card I created.
Next is to provide Product info which includes:
- Product name
- SKU – Stock keeping unit
- Product Description
- Product Pricing ( I recommend you enable tax calculation since you may tax to your country)

Media: Upload videos to entice potential customers
Inventory: Check this if you want to track products in your store
Shipping: This information is information for physical products. You need to calculate the shipping cost based on location so that customers can see it when they add products to the cart. You don’t need to check this if you sell downloadable digital products or run a print-on-demand store since POD platforms fulfill orders on your behalf.
Variant: This is important if you sell products in different colors and sizes. Let’s assume you sell Ladies’ shoes. Use the variant feature to list the colors and sizes of shoes you have in stock.
Category: If you sell different lines of products, set categories for each product you add. This helps customers to find what they want easily and make purchases.
You can enter Product type for more clarification, vendor if you partner with companies, or tag which is similar to category.
SEO customization: Launch Cart has an SEO checklist to ensure that the products you upload appear on search results.
Draft: After filling in your product details, you can save it as a draft, and make it active or inactive.
In my case, I want to upload a digital product (an e-valentine card) and I have filled in all the details.
I click on Save.
That’s it. I’ve added a product to my store.
Click on View Store to see the product you just added:

Launch Cart also gives you control over your products after listing them in your store. For example, you can edit an added product and update it with fresh information. Or even delete it in a second.
There are other vital options under the Products tab:
Create new: To add a new product
Draft: Here you see products you have added but haven’t made active
Categories: You see product categories you have created
Sale & Coupons: Use this to create coupons to boost conversion in your store. It could also be a strategy to offer discounts to sell off products that are in low demand in your store.
Inventory: Enable this to allow Launch Cart to track items in your store. This is for accountability purposes and for you to know if your store is growing or not.
Reviews: Here you see reviews customers leave on your store. I recommend you enable this as it serves as a way of getting feedback from customers. Don’t be scared of negative or dishonest reviews as you have options to moderate them.
Orders: This feature shows you every order made in your store. Enable it to track which products appeal more to your target customers. Launch Cart has an order filtering system that allows you to see orders within a specific period of time.
Abandoned Cart: Here you see products customers added to cart but couldn’t proceed to complete the purchase process.
Customers Tab
Here, you see a list of customers that have made purchases in your store.
Analytics Tab
The analytics tab shows you the overall statistics of your store. This is where you know if your store is doing well or not.
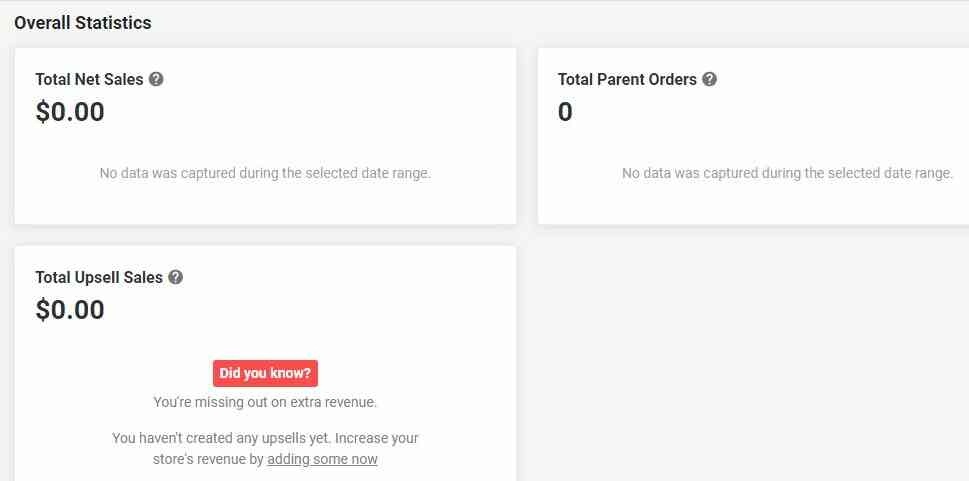
It shows you:
- Total net sales
- Total parent orders
- Total upsell sales
An important aspect of the analytics dashboard of Launch Cart is the Conversion Insight.

It shows how potential customers begin and complete their journey in your store.
You also see the rate at which customers return to your store.
Another is your online store session.

You see the number of visits to your store, sessions over time, top products sold by units, and top landing pages by sessions.
What I like about Launch Cart analytics is that it’s well-detailed and also simple to interpret. You won’t need to add your store to Google Analytics or Oribi which some store owners do to get more details.
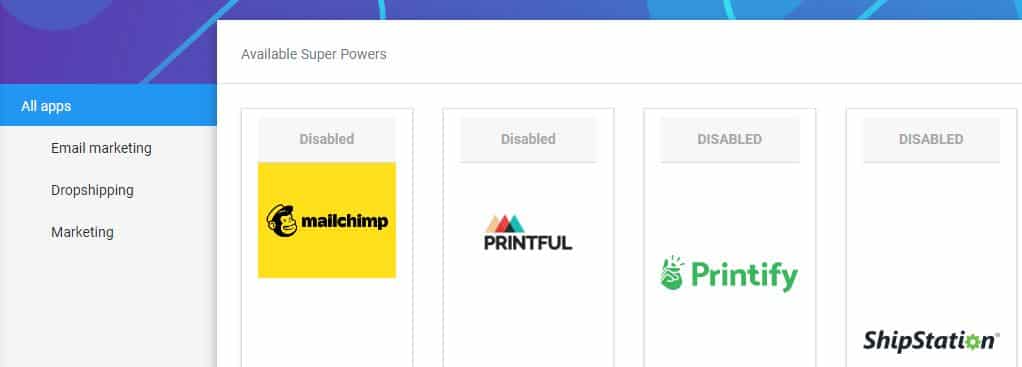
Super Powers Tab ( Apps)
From your dashboard, you can enable powerful apps Launch Cart provides to help you boost sales.
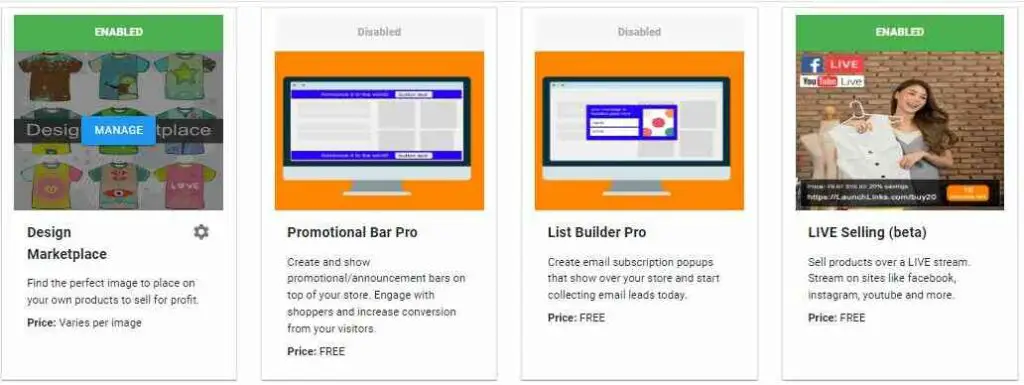
Design Marketplace( Paid): To find perfect images to place on your product and sell. This works if you plan to run a Print on Demand store with Launch Cart. This is a paid app that charges based on the image you choose.
Promotional Bar Pro( Free): Use it to create promotional announcements on top of your store. Let’s assume you want to offer a 50% discount on all your products during Black Friday, this app will help you get that done.
List Builder Pro( Free): Create popups that show when potential customers leave your store. The aim is to collect emails that you can nurture into leads.
Live Selling( Free): You can sell your products via Facebook, Instagram and YouTube live streams using this App.
Automatic Upsells: Launch Cart wants you to sell more products as possible using the Automatic Upsell App. What it does is recommend similar products customers can buy after paying for the one that brought them to your store. Let’s say a customer purchased a pair of jeans from your store. Automatic Upsell will suggest awesome t-shirts they can buy alongside the jeans since both complements each other.
Note: These are few apps available on Launch Cart free plans. You have access to more free apps that can grow your store when you subscribe to the paid plans. And interestingly, Launch Cart updates this Super Power Tab with new apps that help store owners make more sales.
App Store App
Here you get a list of marketing tools you need to grow your store as a beginner. Whether it’s email marketing tools, Print on Demand Platforms, or dropshipping tools, Launch Cart got you covered.
One thing I noticed in the App Store is that Launch Cart mostly lists marketing tools with free plans to help beginners on a low budget get started.
Designing Your Launch Cart Store
Let’s see what Launch Cart offers when it comes to designing your store to appeal to your buyer persona.
On your dashboard, Click on Appearance and select Theme Editor.
This shows you different free themes you can activate to change the layout of your store and start designing it.
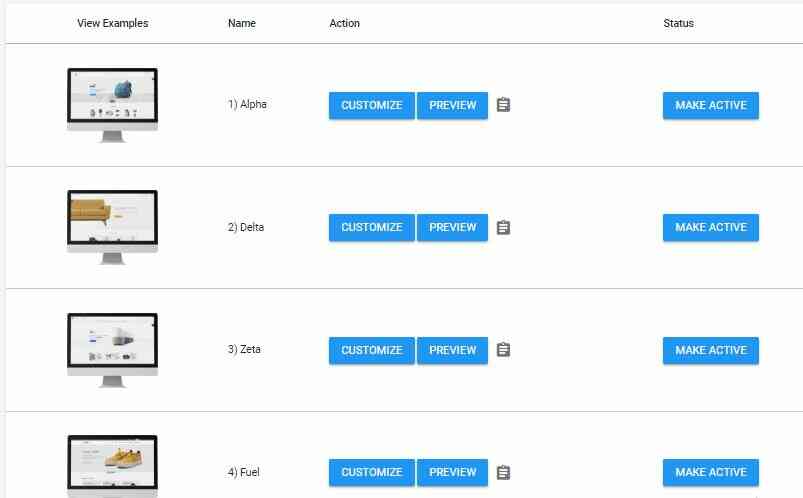
Preview each of the themes to see the appearance they can give to your store. Choose one that suits your needs and Click on Make Active.
Click on the Customize button to make changes as you want, and it’s done in 4 sections: General, Homepage, Colors & Code
General
Here you upload a logo or favicon which is good for branding purposes.

Enable a header which is the content you want to appear at the top of your store.
Let’s assume you want to sell e-digital cards. The header of your store can be – Digital Cards For Every Season
Set the footer of your store by deciding which content you want to show there. A link to Contact Us or About Page is fine.
Launch Cart also gives you the option to display your store phone number which customers can reach you with, store address, or subscription form to collect email addresses.
You can also add links to your social media platforms.
Click Save when you are done.
Homepage
First is to enable the homepage, so you unlock different features to customize the appearance of your home page.

Here you enable the following:
Show Slider: Upload images of products that will show in the sliding format when visitors land in your store
Show Top Categories: If you have created product categories, tag them here, so they can show on the homepage. The essence is to make shopping easy for customers.
Show Featured Products: If you have products that rake in more sales, add them as featured products. First-time shoppers may also like to buy them when they see them on the homepage.
Show Icon Benefits: Anything you think can entice visitors to make purchases should be here. Examples could be your fast shipping rate, discounts, money-back guarantee, safe and secure payment, etc.
Click on Save when you’re done.
Colors
Choose colors that will suit your store. There are primary colors and custom color values.
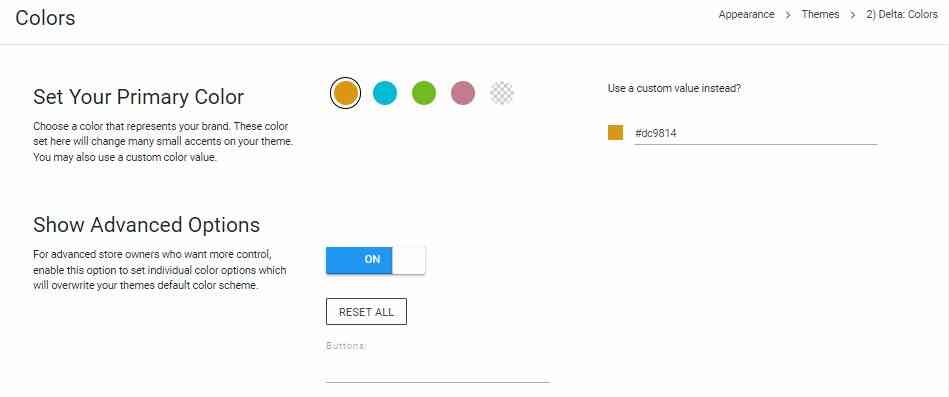
There is an advanced option to set tailor colors to suit your store. This involves having individual colors that replace the default color theme. I recommend this if you have experience in designing ecommerce stores otherwise you may end up messing your store with awkward colors.
Click Save if everything is fine.
Custom Code
This is the last stage of customization of your store. You can use a code to make changes on different pages of your store.
Getting things right here requires you to have knowledge of coding otherwise you mess up your pages. I suggest you hire a developer.
Remember to click Save to effect any changes you make with the code.
At the end of designing and customizing your store, preview your theme to see the new look your store has.
Customization Of Checkout Editor
This feature is only available if you are on the paid plan. Launch Cart empowers you to design your checkout page to suit your taste.
You can also customize some pages on your store.
Menu Configuration
This is the final phase of designing your store. You set how visitors can navigate your store to find what they want easily.
Final thought on Launch Cart review
If you’re looking for an ecommerce platform that’s cost-effective, easy to use, and offers free tools to boost your sales, Launch Cart is your best bet.
I’ve shown you its features from the dashboard and how to use them to design your store and sell your products. It’s up to you to weigh them against what you want in an ecommerce platform. And if it measures up, begin with the free trial and upgrade to a paid plan later.
![What Does EUC Mean on eBay? [Explainer for Sellers & Buyers]](https://www.depreneurdigest.com/wp-content/uploads/2022/06/what_does_EUN_mean_on_eBay-150x150.png)