Do you want to learn how Shopify works in Canada? Do you want to open an online store in Canada? For any reason you are searching for Shopify Canada, I have answers for them in this guide. You will learn how to start a store on Shopify Canada, plus I will answer other questions that relate to Shopify Canada.
What is Shopify Canada?
Shopify Canada is a variant of Shopify Inc, which happens to be a Canadian multinational ecommerce company that has its headquarters in Ottawa, Canada. It is mainly for Canadian residents who want to start their ecommerce business on Shopify or engage in businesses that will make them money on Shopify.
How to start a Shopify store in Canada
Shopify is an all-in-one ecommerce platform that has everything you need to open an online store and sell your products to prospective buyers. You can start dropshipping or selling either physical or digital products on Shopify. No special skill is required and you can set up your store and start selling without any help.
Let’s see how it works.
Step 1: Choose a business name
Deciding your business name on Shopify is the first step to starting your store. But don’t spend much time on it. Think of a simple name that people can remember. It can even come from the category of products you want to sell.
Assuming you want to sell women’s clothing, your store name can be “Classy women store”. You can use Shopify business name generator which is a useful tool for generating business names. Add keywords you would want in your business name and it will make suggestions.
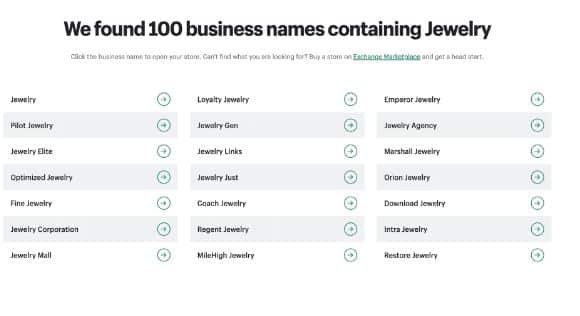
let’s assume you want to sell jewelry on Shopify Canada and you entered the keyword jewelry in the business name generator, below are the suggestions you will get:
For any business name you choose, I recommend, you check if it is available for use as a domain name. You need to connect the Shopify store to a domain for it to be live and you need to buy a domain if you won’t use the free domain Shopify offers. It makes sense for your store and domain name to be the same. It’s a sort of branding.
Step 2: Create a Shopify store
Before now, you have to hire someone to create an ecommerce store for you. You also pay to maintain it. Shopify has changed all that. It handles all that while you set your store and focus on sales.
Go to Shopify.ca which is the Canadian variant of Shopify. Enter your email address and click on start free trial. Shopify Canada offers a 14-day free trial, and no credit card is required. Enter your store name and you are good to go. You have to upgrade to any of the Shopify pricing plans to keep your store active after the free trial period.
Step 3: Install a theme
The first eye contact customers have with your store is the theme. It is the layout of your store on which everything is built. It must appeal to and make potential customers feel they are in the right place. Shopify automatically assigns a default theme to your store when you create an account.
It looks great for a beginner but you can change it with other free themes if you don’t like it. However, Shopify free themes lack the advanced features you need to meet the demands of your store as it grows. That’s where installing an advanced theme like Debutify comes in. You need add-ons to automate tasks in your store and Shopify’s free theme does support them.
Step 4: Set up menu and pages
You need to set up your menu and some important pages your store should have.
Menu shows up on every website including ecommerce websites. It is shown at the header of your store. Users will use it to easily find information about your store.
To set up the menu of your store, go to your Shopify admin > Navigation section > select edit ‘Main Menu’ card and list all your collections there.
Next is your footer. To create a footer, Navigation > Add menu. Write “Footer menu” as the title and then decide what you want users to see in the footer. The good idea is to make the latest blog posts on your Shopify store live there. You can also make the latest products you have in your store live on the footer. Users who click on it will be redirected to the pages where they are.
Set up About Us page. Users who land in your store will want to know about your store. It should be unique and pass a message that can build their trust as they make the decision to patronize you. It should contain basic information about your store, what you sell, and how you are different from your competitors.
Don’t forget the Privacy & Policy page. State the legal terms guiding the operation of your store. State clearly the conditions under which a customer can return a product and get a refund. State your terms and services so that any customer who purchases from your store is assumed to have agreed to them.
Thankfully, Shopify has tools for generating privacy and policy.
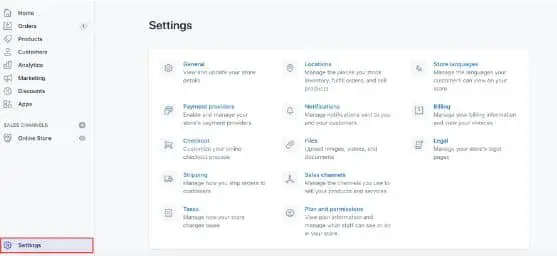
You can access them from Shopify Settings > Legal > scroll down to Refund > Privacy > Terms of Service > Shipping statements section to generate each policy sample.
Step 5: Add Products
Adding a product comes next after creating a Shopify store. This depends on the business model you want to operate in your Shopify store. There are two types of business models that work on Shopify:
- Selling your products
- Dropshipping
You can sell your own physical or digital products. You don’t need to source since you create it yourself.
Dropshipping which many merchants do involves selling other people’s physical products and making a profit from the extra amount they add to the actual amount.
Dropshipping works this way: A customer places an order in your Shopify store, takes the extra fee you have added to the actual price and forwards the order to your supplier, and pays the actual price. The supplier ships the product directly to the customer. You don’t need to hold inventory or worry about shipping which takes time. Your supplier handles it.
Sourcing reliable suppliers is a challenge merchant who dropship on Shopify face. There are many dropshipping suppliers and below are my top 5:
- Aliexpress
- Doba
- Worldwide brands
- Modalyst
- Spocket
Aliexpress is the best and most popular. It has a wide range of products which are cheap, so you can add your own fee and still sell at a reasonable price. The suppliers on Aliexpress are mostly manufacturers with the capability to deliver a large number of products in the most popular locations around the world.
It is like a partnership where they add their products to your store, and you forward the order from a customer to them for fulfillment. This is after you have deducted the extra fee you added to the actual price of the product.
Let’s see how to add product to your Shopify store
After importing products from your supplier, it is time to add them to your store. The first thing is to sort them into collections. Then do the following:
Add the product name: This should be the name many prospective buyers can use to find the product.
Description of the product: Provide detailed information about the product. This includes the features of the product, its function, and why it is better than its rivals.
Price tag: Set the amount you want to sell it
Images: Use high-quality images that will appeal to buyers. Ask your supplier for one. Some of them can share with you and others materials that can help you make sales.
Category: Product category is called collection on Shopify. This is a way of arranging related products so that users can easily find what they want in your store. It is also a strategy to upsell customers.
Let’s assume you have a women’s shoe collection in your store. A customer who bought a black designer shoe and later found the pink color of the same shoe appealing is likely to buy it.
Step 6: Set shipping rate
Whether you’re dropshipping or selling your products on Shopify, you need to set a shipping rate. Add the shipping rate of the supplier for any product if you’re dropshipping. For your own products, set the shipping rates.
You can also offer free shipping to your customers. Many Canadians who buy from Aliexpress get free shipping. That’s a strategy to get customers fast as a beginner. You absorb the free shipping cost by adding it to the product’s price.
Go to Shopify Settings > Shipping and delete all shipping zones that are “Domestic”. Next, click the “Add shipping zone.” If you’re offering free shipping, type it in and then choose “Rest of world” if you want to ship to other countries apart from Canada. Now go to “Add rate” under the “Price-based rates”
Click Save when you have done everything correctly.
For paid shipping, state the rates so that the customer can know. Since you are selling on Shopify Canada, consider integrating Shopify with Canada Post to generate live pricing.
Step 7: Set taxes
Every ecommerce business pays tax. You are required to collect sales tax from your customers. It is a difficult task, especially for beginners. But not to worry, Shopify does the heavy lifting for you. It auto-calculates the sales tax according to global rates. You can also decide to seek the opinion of a tax consultant in Canada to help you since there are specific tax requirements for certain products in Canada.
To effect this in your store, go to Settings > Taxes to set up your region( Canada). You can override the defaults if specific conditions apply to your products or modify the default rates if you wish. You can also enter your tax number here. Note that Shopify doesn’t remit or file your sales taxes for you. You have to do it yourself.
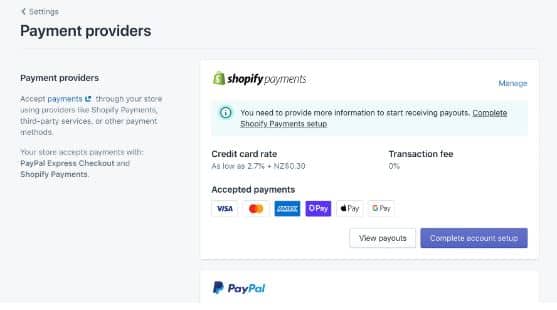
Step 8: Set Up Payment
You need to have a payment method through which prospective buyers can pay for products in your store. I recommend Shopify payments. It allows you to accept payment via Credit cards, Google Pay, Shopify Pay, and lots more. Sign Up for Shopify Payment by providing Shopify with your personal information, bank account number, product information, and business information. If you wish to accept PayPal payment using Shopify payment, go to Shopify Settings under Payment Section, and add your PayPal email address.
Step 9: Set Up Checkout
Shopify allows you to edit and modify your checkout settings. As a beginner, I suggest you keep the customer account optional. This is to ensure they checkout as guests. In addition, you can set the following options:
Abandoned checkout: the feature will automatically remind prospective customers that they reached the checkout stage but didn’t make purchases. Shopify will send a reminder 10 hours later that they are yet to complete the purchase process they started.
Customer contact: Let customers decide how to reach you after placing an order in your store. It can be via text or email. I will recommend email if you plan to build a list with them.
Email marketing: You can give customers the option to subscribe to your email list after placing an order. Use email marketing tools like Getresponse or Activecampaign to create a form and embed it on the checkout page. That’s like having your customers in your circle. You can send them promotional emails on new arrivals in your store.
Final thought on creating a store on Shopify Canada
Starting your store on Shopify Canada is simple if you follow the steps I showed you in this guide. Shopify has made everything easy for you. It automatically adds a free theme once you create a store and within a few minutes, your store is ready.
If you plan to dropship, you can source suppliers from Aliexpress.
Use the free tool from Shopify to create your privacy and policy page. Remember to upgrade to a paid plan before the expiration of the 14-day free trial which Shopify offers you.